How to get your home DJ space sounding great

As we discover in this guide to home acoustics, some of the most meaningful improvements you can make to the sound of your DJ space are either cheap or free.

Listen to this article written by Bridge contributor Jordan Rothlein

I made one of the bigger faux pas of my career while setting up to record a podcast interview at the Tokyo apartment of a festival promoter and serious audiophile. To make space for a mic stand I picked a throw pillow off the floor, from what seemed like a random spot behind the dining table where we’d be conducting the interview.

Turning to ask where I should put it, I saw that the promoter had gone pale. “That, uh, needs to stay,” he said, grabbing back the pillow and carefully re-nestling it behind the table. This wasn’t, I realized, a pillow that got lost on its way to the couch, but a simple absorber for some unwanted frequency from his elaborate hi-fi system, which was spread across the whole front wall.

I can’t promise you the pillow was doing much—audiophilia is, famously, a dark art built on diminishing returns—but this transgression gave me the urge to improve my home-listening setup, which is geared toward DJing. 

Though there’s always some gear upgrade one could make, the biggest gains come from a distinctly low-tech understanding of your space. In the promoter’s small but comfortable living room I noticed lots of subtle touches that would have contributed to the room sounding good, from an abundance of soft materials, to the particular angle of the futuristic speakers, which seemed to correspond to a spot on the couch in the middle of the room. It even occurred to me that his loosely packed shelves of records, lining a side wall perpendicular to the hi-fi, might be doubling as a sound-trapping device. (More on that later.)

DJs don’t need to be audiophiles, but we can use some of the same acoustics principles they rely on to get clarity, detail, and physicality out of DJ gear at any price point. Getting your DJ space to sound its best is an important functional consideration: the better you can hear the music, the better you can mix it. And that applies whether you’re playing on the setup of a festival headliner, or on a basic controller and hand-me-down studio monitors. 

Though I’ll make some recommendations that cost money, this will be the rare music tech feature that doesn’t make you want new gear. Instead, I’ll offer ways to get the best sound out of whatever gear you use by thinking about the space it lives in.

The basics

Whenever sound is amplified in an enclosed space, the goal is to get as much of the sound from the speakers directly into listeners’ ears as possible. When a speaker produces sound, some of it goes in the direction the speaker is pointed, especially at the highest frequencies, like the sizzle of a hi-hat or a singer’s crisp consonants. But the farther down you go along the range of audible frequencies—upper harmonies from guitar or synth chords, instrument and vocal melodies, basslines, kick drum—the more those sounds spread out from the speakers. 

You still hear sound that doesn’t get to you directly, but only after it’s bounced off your walls, floor, ceiling, or any other hard surface it hits. When sound has to make one or more stops, it gets delayed, the technical term for it arriving late, with some of its initial energy zapped and other characteristics altered by the interaction. 

You’ll probably know “delay” as a useful effect on DJ mixers, but in room acoustics it can be a big problem. Late-arriving sound waves, which are measured in milliseconds, interfere with the ones arriving directly, affecting how clearly we hear notes and details within the music. Acousticians talk about this as coloration—a term that can be positive, like in an old church that holds lovely chamber-music concerts, but something to avoid when trying to hear the contours of a track played through speakers.

Lower frequencies present special challenges. Sound waves propagate through the air in your room, which means they take up physical space. And there are frequencies whose size will correspond to the dimensions of your room. These are standing waves, and if you’ve ever been in a room that seems to hum along to certain moments in a track you’ve experienced them. This is literally the room aligning to a frequency and reinforcing it, causing a boost of energy that doesn’t dissipate as quickly as other parts of the sound.

Your speakers may filter out the lowest frequencies on a recording, but if your system is producing such low frequencies that there isn’t enough physical space for the waves to propagate, they introduce even more distortion and rumble into your space.

Don’t touch that dial

As you can see, all of these issues have to do with sound’s physical properties. Thus, this isn’t a problem you can solve (at least not entirely) by changing a setting or swapping out one of your components. The best way to stop delayed sound, standing waves, and any other distortions from muddying the direct sound from your speakers is to stop them in their tracks.

You can probably picture how this gets solved in a high-end recording studio or modern concert hall: grids of methodically placed foam, layers of spaced acoustic tiles floated from the ceiling, maybe even floated rooms-within-rooms engineered to have minimal parallel surfaces (thus minimizing resonances). But please don’t let this platonic ideal of acoustic management freak you out and stop you from doing anything to improve your own space. There’s lots you can do that’s suggested by the way a studio control room is set up, without having to invest pro-level money (or any money).

Start at the sound source

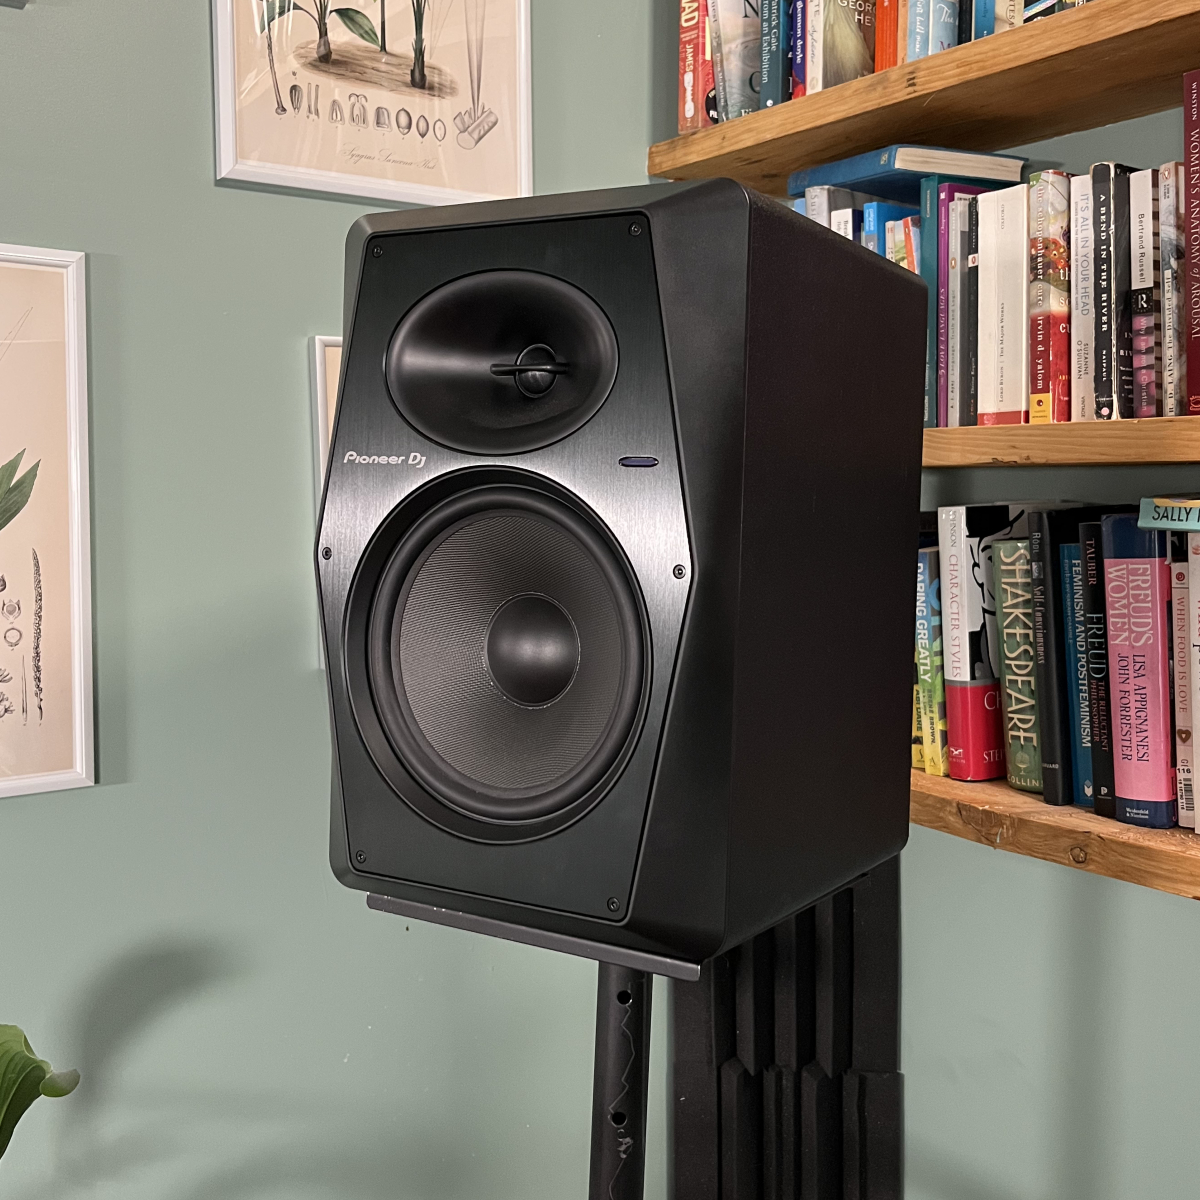
We’ll begin with speaker placement. But before we talk about the front of the speakers, which typically have two sound-producing parts—a tweeter to produce high frequencies and a woofer for the mids and lows—let’s think about what’s going on behind them.

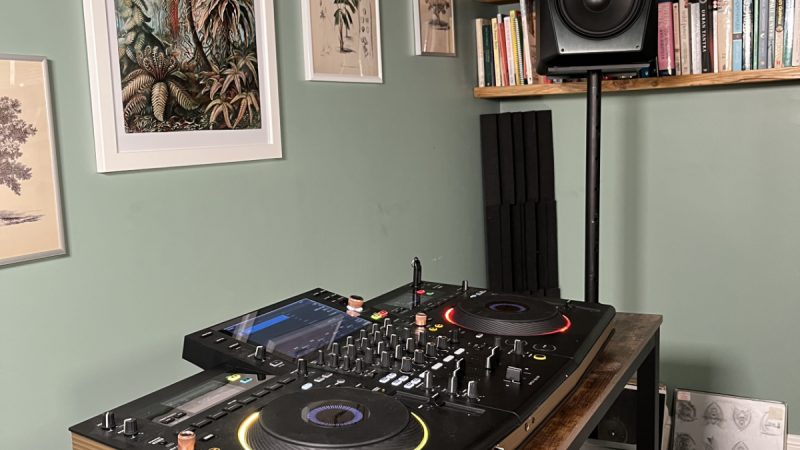
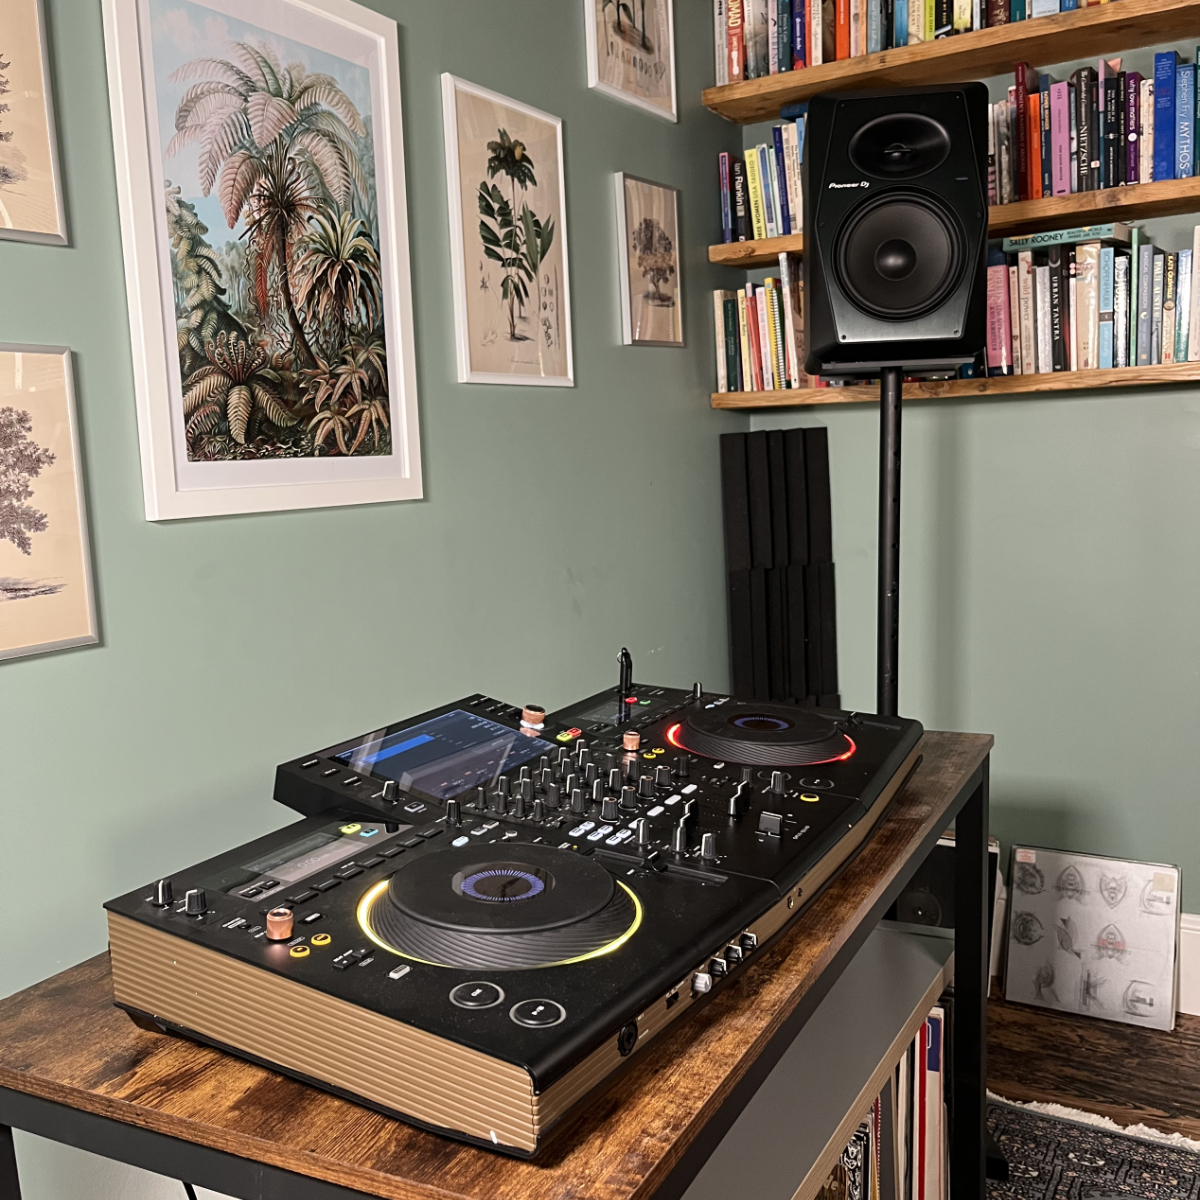
I’d wager that the majority of home DJ setups sit flush against a wall. In such a tight setup, you hear the direct sound from your speakers along with quite a lot of reflected sound off the wall behind them, which affects the clarity of the music you’re playing. If this is you, consider whether your space allows for you to get your speakers out from the wall a bit. Three feet or more would be ideal, but if that’s not realistic even a foot can help get more direct sound and less rough reflections into your ears. If you can’t move out into the room at all, then you may want to add an absorptive material behind your DJ setup. A heavy draped curtain hung from the wall would be the classic move.

Knowing how we want the speakers to sit with respect to the wall gives us a good general position for them. Now, we’ll make some finer adjustments to create a sweet spot—the place where the clearest possible image of the sound comes together between the speakers. (This is under the assumption that you’re using two nearfield monitors, wired up in stereo, to hear the main mix out of your controller or mixer.) We’ll build the sweet spot around where the DJ is likely to be during the most involved parts of the mix. Find where that is for you and mark it.

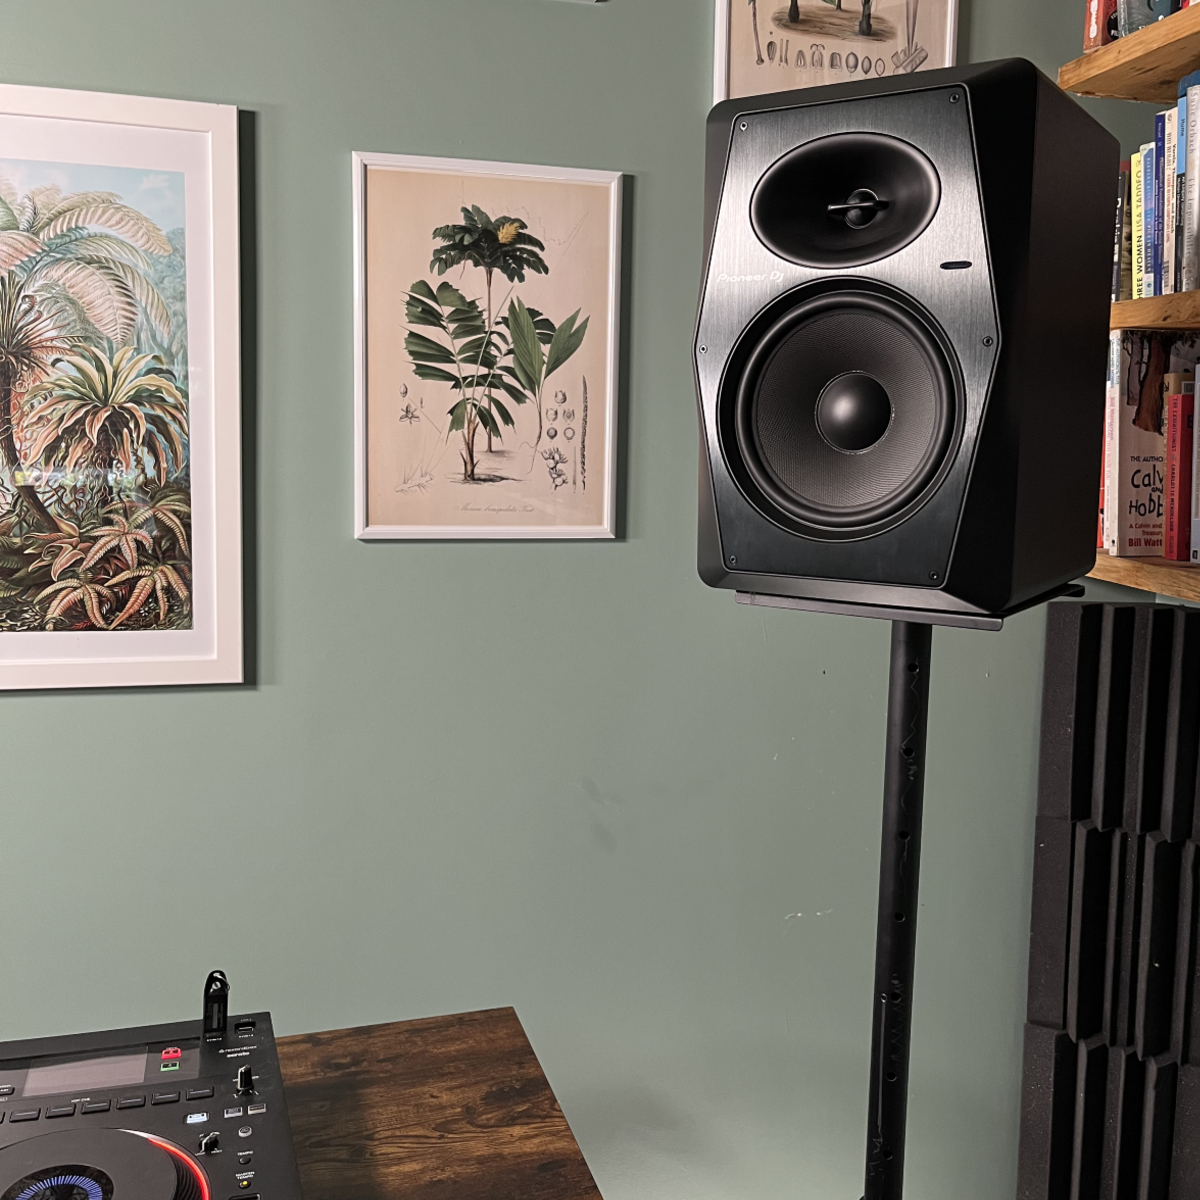
You’ll next want to get the speakers close to head height or, if the speakers need to sit below or above you, angled up or down to make a straight line to your head. I don’t recommend angling speakers nearly as much as finding a solution that lets your head align vertically with the speakers, since it makes the next adjustments a whole lot easier.

Though they may feel unstable, a simple pair of studio monitor stands has been my tried-and-true method for placing monitors at the same height as my head when I’m standing. I’ve never had one topple over on me, and it’s always made creating a sweet spot for my DJ setup fairly easy, as I don’t have to worry about an up/down angle, and I can easily make tweaks through the next step.

The sweet spot

Now, find the correct angle for your speakers. If your controller or mixer/decks are sitting on a desk or table, and your speakers are set up on either side of the desk, point each speaker so that you can draw a straight line from the tweeter to the ear closest to it. Standing at the center of your controls, you may notice there are a few ways of doing this: you could angle your speakers more inward, creating a tight sweet spot over your mixer, or you could angle the speakers more open, to hit your ears when you’ve stepped back a little, or somewhere in between. 

The more you angle your speakers in, the narrower—but perhaps more precise—your sweet spot; the more you angle them out, the wider your spot. This is a personal preference that comes down to how you like to DJ and, if you stand when you play, where you’re likely to be at the most critical moments of the mix. (If you play back-to-back a lot in your space, consider going wider.) What’s most important is that you create a spot you can stick your head into and hear the music clearly across the whole range of frequencies.

Once you get the basic angle down, you can use string to measure the distance on one side, then duplicate it on the other; a precise number of inches or centimeters is less important to setting the angle than making sure it’s as close as possible to the same distance on both sides.

What I don’t recommend is “playing to the room.” For a personal DJ setup, the highest priority should be creating a zone for careful listening, with as much direct sound as possible. In most home or small studio situations, the sound coming out of those monitors should be plenty for anyone else who’s hanging out, so long as you’ve addressed any other major acoustic issues in your space (more on that below). 

The rest of your room

Unless the precise spot where you DJ is also where you produce music or do mixdowns of tracks, you can use some basic acoustics principles and a lot of common sense to treat the rest of your space. Is the floor of your space wood, concrete, or something else really hard? Throw down a rug. The more of the space it covers, the better it will kill a huge reflective surface within your space.

The ceiling is trickier: a low-ceilinged basement presents different challenges than a high-ceilinged loft. In the basement, the first-order reflections coming from the ceiling can cause similar issues to what I discussed about the back wall, so treating from the wall behind your setup to at least a foot or two behind the sweet spot can be a big help. If you’re in the latter camp and have some headroom, you don’t have to worry about killing the whole ceiling, though some staggered acoustic tiles can help with reverberance. If you’re able to get creative and add some depth to how they’re hung, you may be able to cut down on parallel surfaces, thus lessening the effects of resonances/standing waves.

Along the sides and back wall of your space, avoid blank spaces and symmetries. The more varied your surfaces, the less likely you are to get a build-up of resonance. Shelves of vinyl records, books or other media that aren’t packed completely to the gills can function as good diffusors—a material or device that doesn’t simply absorb sound but also scatters it, making the reflections back less predictable and thus less perceptible by our ears. (It’s good practice to incorporate some diffusion into your acoustics treatment, as relying solely on absorption can kill sound to the point that your room sounds dead.)

The irregular spacing of a not-totally-full bookshelf accomplishes the diffusion, while materials like cardboard record sleeves and paper pages provide subtle absorption around the mids and highs. Couches and other soft seating are also great absorbers of sound. We’ve all heard a glass frame rattling along with a bassline, but don’t feel like you can’t hang any art on the wall. It’s all about finding balance. Hopefully, if you’re emphasizing materials and structures that can absorb and diffuse sound, there will be less extraneous sonic energy moving through the room to create buzzes and rumbles.

Frequency-specific fixes 

Everything I’ve mentioned so far is to help achieve a balanced sound, but you may still find your room sounds lopsided frequency-wise—a little boomy, perhaps, like the bass still has a life of its own. As mentioned before, the low-end tends to require some special attention. Bass waves are so big that you can’t just kill them with a few inches of fabric or foam (they’ll travel through it) and in the context of a room, the energy of the wave can keep feeding on itself, causing it to take longer to dissipate than higher frequencies. 

For technical acoustics reasons I won’t go into here, bass tends to pile up in the corners, which makes it the best place to address those problematic frequencies. While you may find complex resonators or membrane traps in fancy recording studios, there are plenty of DIY hacks for killing bass. You can put stuffed armchairs in the corners of the room, stack folded duvets there, even let that be the place you pile up all the laundry you’re overdue to fold. This is likely what the Tokyo audiophile’s pillow was aiming to achieve. But if your room’s aesthetic can take it, pick a thick, relatively dense material and pile it into the corners.

How are we sounding? 

With all of these considerations in play, you’re likely to discover your setup sounds better—clearer, more balanced, more detailed. The important parts you need to hear for mixing like bass and drums may feel a lot easier to grasp. You may also find that you don’t need to boost your levels so high. While this isn’t a piece about soundproofing (the treatments here are geared towards making your space sound good, not isolating it from the outside world) the solutions I put forward are neighbor-friendly regardless, as you won’t need to boost your levels in search of the musical details. 

As we all know, exposure to high sound pressure levels can damage our hearing, and even if your studio monitors are the fraction of the size of a club rig, putting your ear right next to one that’s blasting can still do damage. Why have a home setup you have to push, when with the same gear more thoughtfully arranged and conceptualized in space, you can have one that’s actually pleasant to mix tunes on?

Like the Tokyo audiophile, you can find acoustics solutions that don’t result in your living room becoming a recording studio. In many cases, you’ll already have the materials you need, or you’ll only need to get a friend to help move around some furniture. Don’t make any plans for after, though. Even if you’ve had your gear for a while, mixing on it might feel brand new.

Words: Jordan Rothlein