A digital DJ’s guide to vinyl ripping

Often thought about enjoying your record collection digitally but never got around to it? Here's a step-by-step process for converting your vinyl into club-ready files.

In DJing, old and new exist side by side. Most modern DJs play with laptops, USB drives, and other digital tools. But many of us still use vinyl (or at least have a collection back home). Those bulky black discs are portals to the past, giving access to decades of musical history. They sound different, they feel special, and they hold countless sounds that have never been digitized.

Having a collection that bridges the analog-digital divide can get complicated, though. You may want to bring those vinyl records you love into the digital ecosystem where the rest of your collection lives. One way of doing this is by ripping the vinyl. That is, recording it to a digital audio file for later use. 

Vinyl ripping is often considered an esoteric art, best left to audiophiles with costly kit and years of expertise. But many DJs can easily acquire the equipment and skills needed to make a decent rip. In this article, we’ll walk you through how to do this. We’ll cover the gear you need, the pitfalls to avoid, and—most importantly—the questions you should ask yourself before you even get started. Getting a good rip isn’t just about buying the most expensive cartridge or preamp. What you do with the digital file once it’s recorded can also have a big effect on the outcome. 

The good news? If you already have DJing equipment you may be most of the way to having a solid vinyl ripping set-up.

Consider why you’re ripping

Before you start building the vinyl ripping setup of your dreams, ask yourself: Why am I doing this? 

There are many good reasons to digitize your DJing collection. Vinyl is bulky and difficult to travel with. It’s fragile and degrades through use. There’s only so much of it you can bring to a gig. And your shows can only be as good as the turntables you perform on. A poorly maintained setup can ruin a vinyl gig. Digital files, played via a CDJ or another media player, free you from these limitations. 

Even if one of the above reasons applies to you, a vinyl rip may not be the best option. If the music is available digitally, it’s often better to buy the digital file than to rip the record. Vinyl ripping is a slow process, and even the best-sounding results may not match up to a digital master. 

But there’s a hurdle here. In the streaming era, it can be surprisingly difficult to find lossless downloads of even mainstream music. (And ideally you should get a lossless file for DJing purposes, though a 320kbps mp3 may still sound better than a lossless vinyl rip, especially if it’s a poorly pressed or damaged record.) If the popular stores don’t have it, try less well-known download sites like 7Digital and Qobuz. For older music, search Discogs to see if there was a CD release that you can rip from.

If you’ve explored these avenues and ripping is still the best option for you, then it’s time to start building your setup.

Record player

First up: the turntable. There are two key questions to consider here. Should you use a DJing-style deck or a hi-fi turntable? And how much should you spend to get decent sound quality? 

The headline info: if you already have a good quality industry standard DJ turntable this will work just fine. It’s not worth buying an extra turntable just for ripping unless you’re looking to get really serious.

That said, there is some difference between using a direct drive turntable like a PLX-1000 and a belt drive hi-fi deck. Direct drive turntables tend to generate more motor noise, which can sneak into your recording. However, you’re unlikely to notice this unless you’re ripping very dynamic music with quiet sections, such as classical. Just make sure to use a rubber mat instead of a felt slipmat to avoid vibrations from the motor reaching the cartridge.

On the other hand, direct drive turntables often run at a more consistent speed, leading to fewer timing variations in your recording than when using a belt drive (hi-fi) turntable. Pretty much all vinyl rips will fluctuate a little in tempo, but your belt-drive rips might waver more. If you’re ripping rhythmic music for beatmatching this could be significant. But whatever deck you choose, these fluctuations should just require a few nudges on your CDJ’s platter or tempo control.  

You don’t need to break the bank to get a decent ripping turntable. Those staggeringly expensive audiophile decks are surely nice to have, but they’re not necessary. Do be wary of budget models though, in both the DJ and hi-fi markets. These are unlikely to deliver the sound quality you need.

Cartridge, stylus and setup

The stylus and cartridge are the most delicate parts of the whole chain, and they can have a large impact on the quality of your rip. You should invest in decent kit, but there’s no need to go overboard. 

A good DJ-quality cartridge and stylus should be fine for many ripping contexts. Hi-fi cartridges are generally considered to sound better, but it depends on what you’re ripping. If it’s thumping ‘90s techno, a DJ cartridge might better suit the material. Many top-drawer audiophile cartridges, meanwhile, are probably designed for classical and jazz music rather than loud, punchy pop tracks. Go for a cartridge that sounds good to you and suits your music. 

If your cartridge—and particularly your stylus—is getting on a bit, you might notice this more in a rip than you would while mixing. If you batter it while DJing, it could be time to invest in a fresh one. You could even get a pristine second stylus just for ripping.  

Finally, make sure your turntable is set up correctly to get the best possible sound. Tracking weight, anti-skate, arm height adjustment—use your turntable’s manual or other resources to get these details right. 

Preamp

Next comes the preamp. This transforms the quiet, thin signal produced by a turntable into loud and balanced audio ready for recording. 

Preamps don’t just boost volume. They also change the frequency balance of the signal, to compensate for the way frequencies are adjusted when a piece of music is cut to vinyl. (If you want to get nerdy, read up on RIAA equalization.) Better-quality preamps will handle this boost-and-EQ in a more classy manner than budget ones. This means the preamp you choose can have a big effect on sound. 

If you have a professional quality DJ mixer that’s in a decent state, its preamps will probably sound good enough for ripping. If not, you should consider investing in a standalone phono preamp. Prices vary widely. You don’t need to bankrupt yourself to get something decent, but probably don’t buy the cheapest one you can find.

Audio interface

Next, the sound needs to get into your recording software. For this you need an audio interface, which converts the analog signal from your preamp into a digital signal and sends it to your computer via USB or similar. There are many small, cheap audio interfaces out there, and most will do the job fine. Just make sure you get one with at least two inputs (for the left and right channels of your stereo signal). 

As ever, price does affect sound quality. More expensive interfaces will feature better quality analog-to-digital converters that might deliver fractionally better sound. But the difference is small. When it comes to sound quality, this stage is less important than turntable, cartridge and preamp. 

It’s worth mentioning that most recent DJM mixers include a soundcard that does the job of an audio interface, allowing you to pass audio from your turntable to a computer. 

Cables

You’re going to need some cables to connect your various devices together: a stereo phono cable from the turntable to the preamp, and a pair of cables to connect the preamp to the audio interface. These latter cables could take various forms—phono, TRS, XLR—depending on the sockets on your equipment. If you have the choice, always choose a balanced connection  (TRS or XLR) over phono, as balanced cables tend to be less noisy. 

You may see forum threads praising shockingly expensive audio cables made with fancy materials that supposedly improve the sound. Don’t worry about this. The difference in sound quality between an affordable and a luxury cable is undetectable to all but the most trained ears. Just avoid buying the very cheapest cables you can find, as these are likely to break fast.

Setup shortcuts

If you’re building a ripping setup from scratch, the steps outlined above might sound daunting. But there are a few shortcuts that can get you ripping without needing to buy all those devices. 

Firstly, there are all-in-one USB turntables with a preamp and audio interface built in, allowing you to get your audio from vinyl to software with a single USB cable. If you go down this route, make sure to invest in good equipment. The PLX-500 is very capable for this purpose.  The cheapest all-in-one decks tend to cut a lot of corners to pack in the requisite hardware at an affordable price, and are notorious for their poor sound quality. 

Secondly, some modern club mixers, such as recent DJM mixers, have USB connections that allow them to double as an audio interface (as well as providing a preamp via their phono inputs). If you have an industry standard mixer with this functionality, it should sound good enough for ripping.

Finally, if you have a DVS—a digital vinyl system, which lets you control DJing software with your analog turntables—then you already have a preamp and audio interface rolled into one. The little boxes provided with DVS setups perform both of these functions, though their sound quality may vary depending on the quality of the product.

Recording software

Next, you need software to record your rip. This software should be able to record audio coming from your audio interface and export it as a playable file (like a WAV or mp3). It could also offer features that make the ripping process smoother. 

rekordbox can provide a straightforward solution here. If you have the Pioneer DJ DVS system INTERFACE 2, or a Pioneer DJ mixer or controller (with a phone input) with this functionality, then you can record directly into your library. When using a mixer or controller, simply connect your turntable to the hardware and use rekordbox’s recording function to capture the audio. If you’re using the DVS, you’ll need to change the Deck mode to THRU.

Beyond rekordbox, there are a range of options out there depending on your budget and area of interest. Free tools, like Audacity, perform basic ripping tasks perfectly well and are used by many. If you already have a production DAW such as Ableton Live or Logic, this can also double as your ripping mothership. Aside from basic record and export functions, DAWs let you use production tools—like fancy EQs, limiters, and denoising VSTs—to polish up your rip. That might appeal if you already have this gear. If you’re not a producer, a fully-featured DAW is likely to be more confusing than useful (and probably too expensive).

The middle ground? Specialized vinyl ripping software. These tools combine basic record and export functions with extra features tailor-made for record ripping. They might import release data from Discogs, automatically split a recording into multiple tracks, or offer automated cleanup tools for hiss and pops. Some of this software costs as much as a DAW, but the more affordable options (like VinylStudio) could be worth the investment if you plan to rip vinyl regularly.

Recording best practice

Now you have your setup in place, it’s time to start ripping. Well—not quite yet. 

First you should clean your record to prevent unwanted noise making it onto your recording. If you’ve DJ’d with the record in the past it might be especially dirty, so don’t skip this stage. Specialist tools—cleaning fluid, a record brush, an anti-static cloth—are your friends. There are also fancy record-cleaning machines (like a car wash for your 12-inches), but these may not be worth it unless you’re a ripping obsessive.

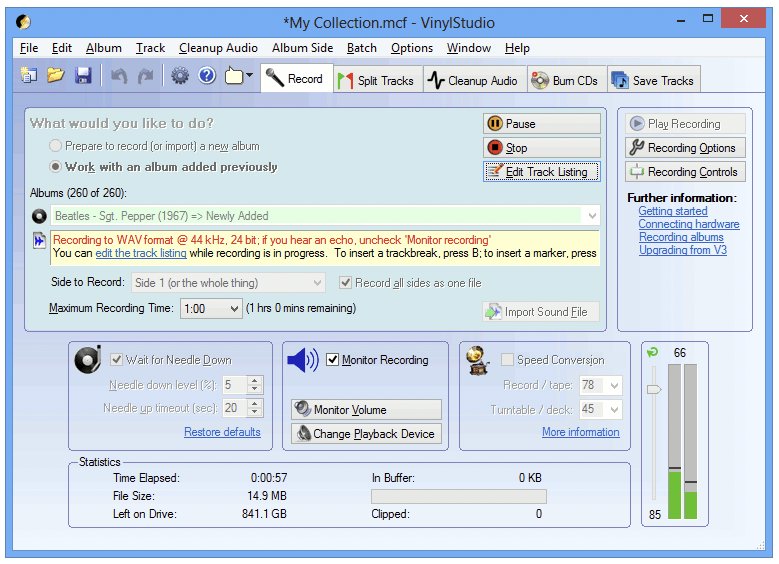
Next, set your input level. Adjust the volume of your audio interface so that the meter in your recording software is showing a strong signal that’s well below the maximum. (In most software, the input level will show green, then yellow as volume increases, then hit red when it’s too loud. Stick with yellow at most.) Check the loudest part of the record to be sure the input isn’t clipping. If in doubt, err on the quiet side. It’s easy to boost the level of a rip later. A distorted recording is much harder to clean up.

Now, finally, hit record in your software and drop the needle on the record. Silences at the start or end of the recording are fine, you can tidy these up later. While recording, try not to stomp around the room or touch the surface your turntable is on. These sounds can be picked up by the stylus, causing troublesome booms and rumbles in your rip. Additionally, keep the volume down of the track you are ripping as speakers can produce unwanted vibration, which may negatively affect your recording. 

Editing the recording

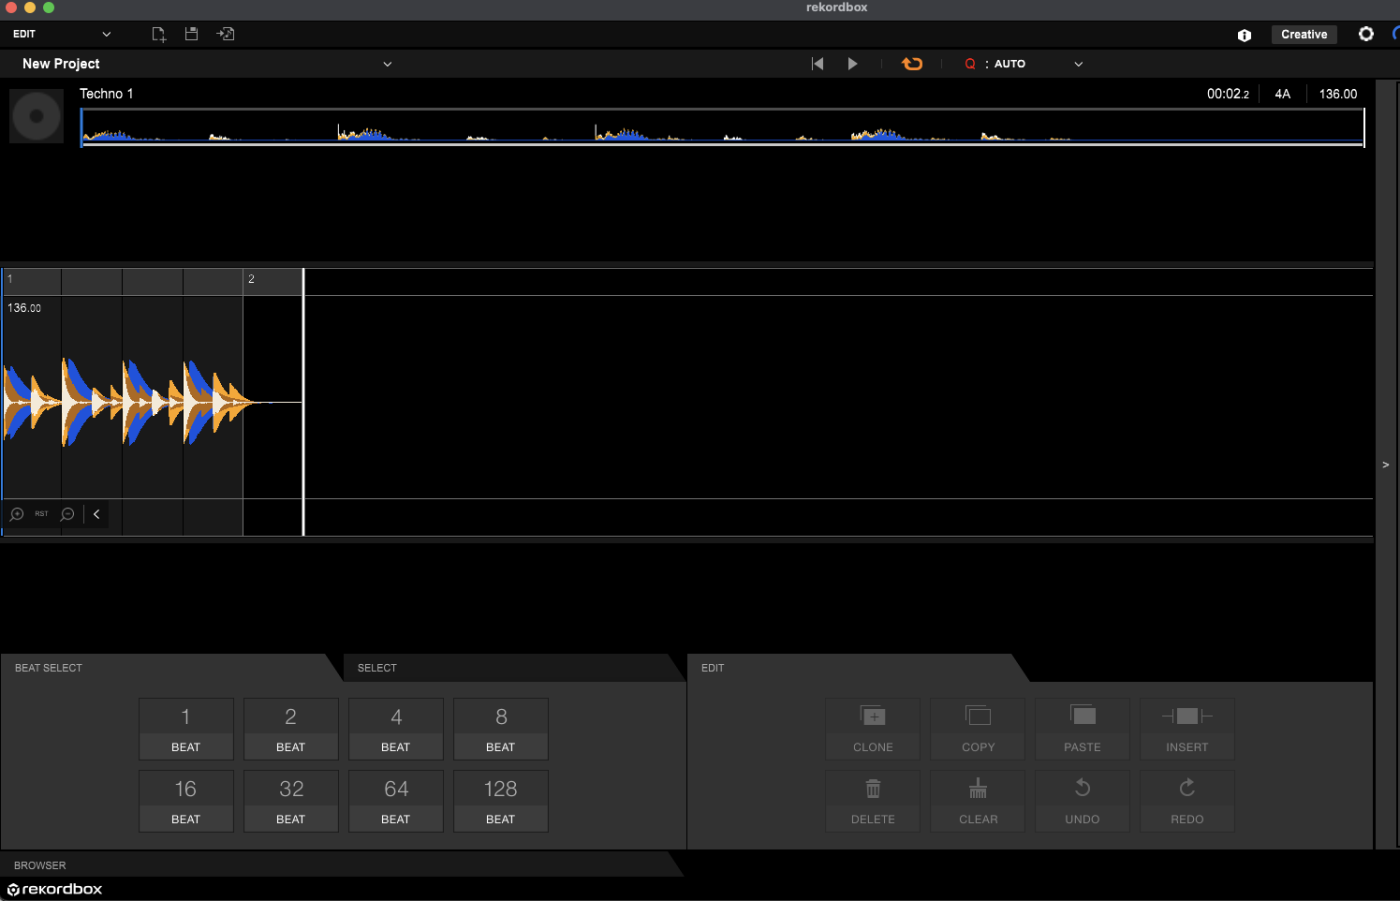
Now you’ve got a recording, the fun can begin. A few technical steps will transform the raw audio into a polished, useful rip. Start by deleting silence at the beginning and end of your file. In most software you can do this by highlighting the unwanted areas and hitting “delete” or similar. Specialized vinyl ripping software might automatically do this for you. 

Next, you need to clean up the audio. Vinyl is a noisy medium, and your records—especially older, well-loved ones—are likely to feature unwanted sounds. A little bit of noise is fine, but loud hiss or a deafening click might make your rip difficult to DJ with. Fortunately, there are tools that address this. But note that, if you can, it’s always easier to get rid of clicks and noise by thoroughly cleaning your record first, rather than using fancy tricks later. 

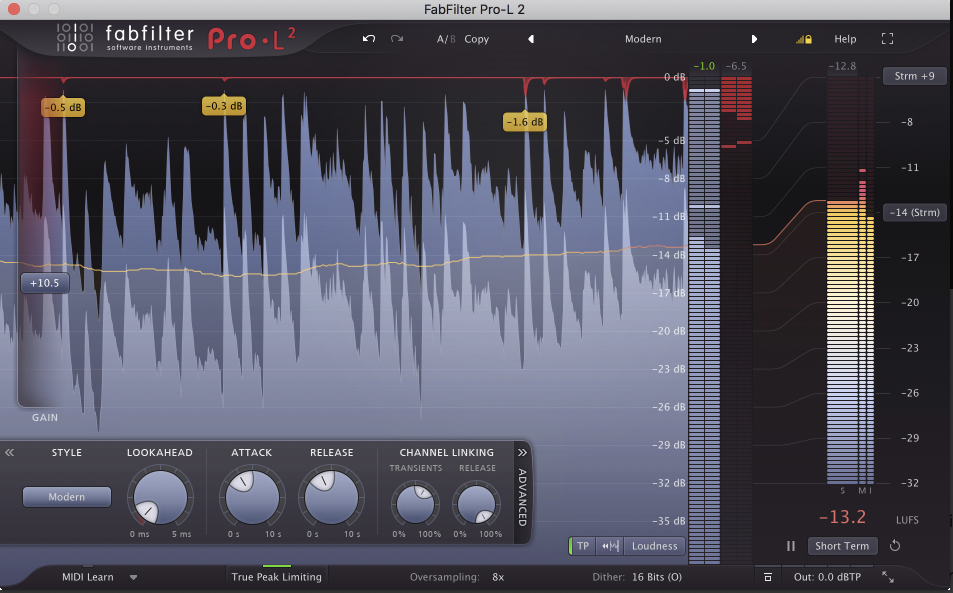
It’s particularly important to get rid of sharp clicks in your recording, as these will make it harder to get the rip loud in the next step. Audacity has a tool to replace clicks, and specialized vinyl software will offer automated features to address both clicks and surface noise. If you’re using a production DAW, you might need to get an additional audio repair VST, like iZotope’s RX. 

Whatever you use, be careful not to overdo it. When slapped on too hard, automated cleanup algorithms can make a rip sound lifeless and digital. They might work better on some kinds of music than others. If you’re not sure whether you’re making things better or worse, it’s safer to leave a bit of noise in.

Making it loud

Next you need to get the file as loud as possible. Loudness is important because it affects playability. In many DJ contexts, too-quiet music sounds “weak” and may not translate to an audience. It’s unnerving to crank the mixer gain to maximum and still feel like something’s missing. By getting your rip nice and loud, you can be sure it will come across well wherever you perform.

The simple approach is to normalize the file—a feature available in most recording software. Normalizing automatically turns up the audio to the loudest it can be without distorting. Specialized ripping software might even do this step without you asking it to.  

Normalizing works fine in many contexts, but you may find that your normalized rip is still quieter than the digital masters you’re playing it alongside. Many rips feature stray peaks (such as pops you might not have caught in the last step) that can restrict how loud your normalization can go. Additionally, for dry technical reasons, vinyl is often mastered to sound less “loud” than a digital master. 

Often this isn’t a problem, but club DJs who need their music to have impact may want to give their rips an extra squeeze. You can do this with a professional grade limiter plug-in, such as Fabfilter’s Pro-L. Put simply, a limiter is a very extreme compressor. Good quality limiters (sadly, the stock limiters found in DAWs may not qualify) make this easy. Simply pick a preset that suits the style of music (like jazz or EDM), turn up the gain until your rip starts to sound “squashed,” then turn it back down until you no longer hear the squashing effect. Hey presto: your rip should be a few dB louder.

EQing

Your rip should be sounding pretty good by now. There’s always more that could be done, though. Many vinyl recordings sound dull in the high frequencies compared to digital masters. When it comes to club music, they may also lack subbass (frequencies below about 100Hz). Vinyl rips can also feature “subsonic” rumble—frequencies below human hearing—picked up by the stylus during recording.

You can use an EQ to address these issues. Most of the recording software mentioned above has an EQ tool of some kind. Specialized vinyl ripping software offers automated tools to address things like rumble at the press of a button. 

If you trust your ears, a bit of manual EQing can also help bring a rip to life. Be wary of making drastic changes, though. If you’re boosting the subbass and those shiny high frequencies, don’t make more than a 1.5dB change in each region. And always compare the results against the original recording (and other music) to check you’ve actually improved your rip and not overcooked it.

(By the way: if you’re using both an EQ and a limiter, the EQ should come first in your signal chain.)

Nips and tucks

This is a bonus step. Now that your beloved track exists in the digital realm, it’s easy to snip it to suit your taste. That awkward-length intro that’s hard to mix with? A simple copy-paste could double its length. How about the pop song with the guest verse you hate? You can remove it with the click of a trackpad. Creating good edits is a deep art, but making quick adjustments for DJ utility needn’t be complicated. Production-focussed DAWs such as Ableton are better for this step than other recording software, though Audacity will work too.

Exporting your file

Once you’re happy with how your rip sounds, export it as an audio file. Pay close attention to the file format. A lossless format will sound best, though if you’re short on harddrive space a 320kbps mp3 is arguably OK. To keep your rips organized, it’s probably best to export in a format that can hold metadata such as artist name and date. WAV doesn’t support metadata, but other lossless formats, such as AIFF and FLAC, do. Note that FLAC doesn’t play on all models of Pioneer DJ CDJ, whereas AIFF does. 

You’ll also be asked to choose sample rate and bit depth. In broad terms, these parameters refer to the “resolution” of the sound (think of the number of pixels in an image). Highest isn’t always best. To ensure your rip plays on the widest range of audio players, it’s best to stick with the standard settings used for CDs and much digital media: 44.1kHz sample rate, 16-bit depth. 

With your rip exported, you can load it into rekordbox and start tagging and playlisting. One quick note here. When rekordbox analyzes the track, you may find that—even if it’s quantized electronic music—it doesn’t match up to the grid. This inconsistent timing is caused by minute variations in turntable playback speed during the recording. If you’re getting an odd tempo (like 136.05bpm), try using rekordbox’s dynamic analysis instead. That way, the software will track the beat correctly right the way through the rip, making it easier to use loops and other features.

Testing

Finally, your rip is ready for action. To be sure you’re happy with it, try it out in the context it’s going to be used. Audition it on a range of listening setups and try mixing it alongside digital tracks. Pay close attention to the loudness and frequency balance. 

A vinyl rip will never sound exactly like a digital master—and maybe it’s nice for your rips to have some unique charm. But if your rip is so quiet that it sounds weak, or totally lacking in high frequencies, then you may need to go back to the earlier edit stages. Don’t be afraid to make multiple versions of your rip and compare them side-by-side. 

Handy tip: the waveforms shown in rekordbox are a quick way of checking frequency balance. When in RGB mode, the waveform changes color depending on the overall frequency balance of the audio. If your rip is a totally different color to the other tracks in your collection, something might not be right.

Once your rip is complete, it’s time to pick a new record and go back to the first stage. Remember, vinyl ripping is a marathon, not a sprint. A good ripping setup will make the process smooth and easy, so that you can digitize large chunks of your collection without breaking a sweat.