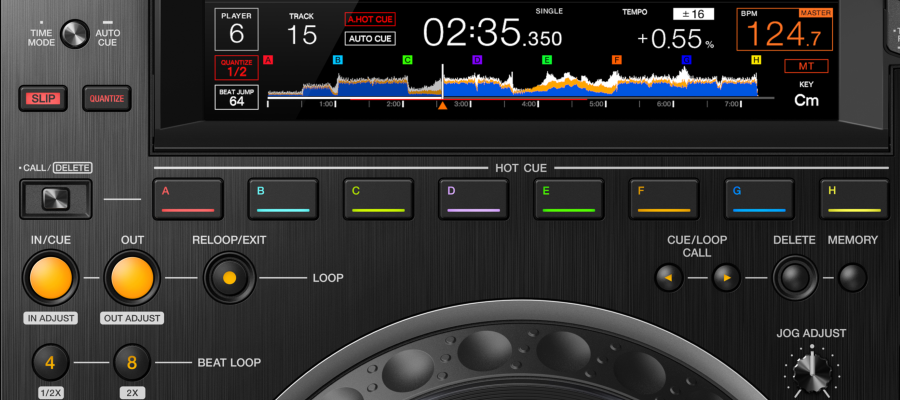
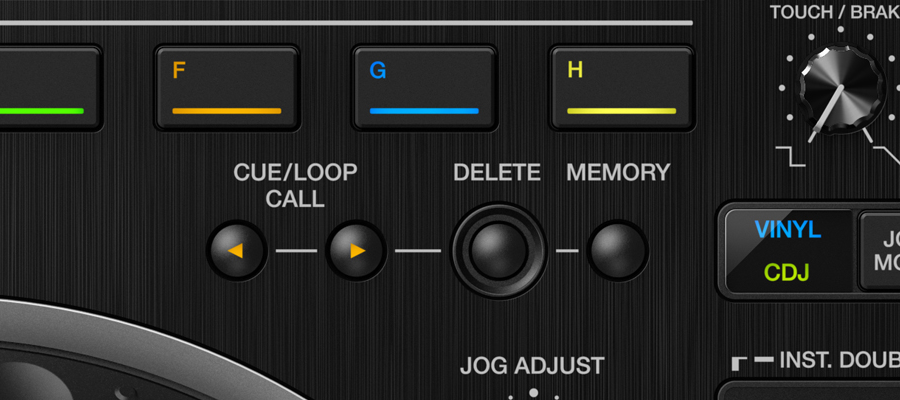
What do all of these buttons do?

Have you ever found the time to properly work out what every button and dial on a CDJ does? Niamh O’Connor has, and she’s put together this straightforward guide to the CDJ-3000's deeper features.

What would SLIP mean when you’re DJing? Slipping into a bar? Slipping into a loop? Where are you slipping to?

The evolution of the CDJ has brought with it some sophisticated features and—for both new and experienced DJs alike—some puzzlement. For me (Niamh O’Connor, a DJ and regular contributor to The Bridge), the CDJ-3000 feels like a spaceship compared to the CDJ-800s I learned to DJ on 10 years ago, with their CD drives and relatively primitive features. If you were anything like me until I started writing this article, you might have noticed buttons like SLIP, KEY SHIFT and QUANTIZE. But understanding what, exactly, they do and actually using them is another matter. 

I must admit the CDJ-3000 feels like a spaceship compared to the CDJ-800s I learned to DJ on 10 years ago, with their CD drives and relatively primitive features. If you are anything like me (at least until I started writing this article), you might have noticed buttons like SLIP, KEY SHIFT and QUANTIZE. But understanding what, exactly, they do and actually using them is another matter.

This knowledge gap might be even more likely depending on the gear you have at home. When I began playing on the CDJ-2000 and, later, the 2000NXS2s, I chose to ignore several of their features as I only had access to the 2000s at clubs, meaning I didn’t fancy finding out “what does this button do?” in a live setting.

Everyone absorbs new information in their own way. If I’m learning a new skill, especially if technology is involved, I need crystal clear instructions and examples to refer to throughout the learning process. That’s why instruction manuals don’t tend to work for me. I need real-world examples of DJs using features.

The aim of this guide is therefore to break down some of the seemingly mysterious buttons on the CDJ-3000 in an accessible and straightforward way. You may not be using, or have regular access to, the CDJ-3000, but there should still be features discussed that appear on your own gear.

Taking the time to understand deeper features can seem like an effort. But once you break things down step-by-step, there’s nothing here that should be too complicated. I’d argue that it’s a worthwhile investment. This knowledge speeds up your workflow, reduces time spent scrolling through playlists, and prevents unnecessary panic in a live situation. The more you know your “instrument,” the more confident you’ll be, no matter the situation.

SLIP MODE

Let’s start with the SLIP button. What’s it for? The short answer is that if you’re performing some kind of technique—scratching, looping, reversing, hot cueing , etc.—the track will continue playing behind the scenes, so that when you stop your technique, the track reappears as if nothing had happened. This is a situation where it’s more complicated to explain it in words than it is to show it, so let’s look at an example.

We’d like to scratch just before a track drops. Make sure VINYL mode is activated, so the jog wheel behaves like a vinyl platter, with the track stopping when you put your hand on it. Then press SLIP, which will light up in red.

While scratching in SLIP mode, notice on the CDJ’s touch display that the track continues playing. This means that when you release the platter, you’ll hear where the track has reached (in this case the drop), because SLIP mode has allowed the track to play the whole time underneath your scratching.

Why is this desirable? It’s much more musically coherent. If you just scratched “in place” the audience’s internal rhythmic clock would be thrown off and your momentum would be lost.

Just don’t forget to turn SLIP off when you’re finished.

SLIP REVERSE

How about SLIP REV? Similar to SLIP, when you push this lever up and hear the track reversing, the track simultaneously continues playing silently underneath. When you let go of the lever, you’ll rejoin the track as if you’d never used SLIP REV.

Let’s again look at an example involving a track’s drop. You could push up the SLIP REV lever to create tension—or confusion—and then release it when you know the drums return. You could gauge this either by watching the playhead on the touch screen or by keeping count and knowing your track well.

Here’s Phil Morse from Digital DJ Tips with a demonstration. As Phil explains, SLIP REV is useful when you want to skip over a curse word in a track (wedding and family-function DJs, take note). Hit SLIP REV just before the offending word, and you’ve essentially “bleeped it out,” returning to the track without missing a beat.

HOT CUE (CALL/DELETE, A to H)


This button calls up your Hot Cues in a track, displaying any Hot Cues you previously created in rekordbox if they weren’t automatically loaded along with the track.

If your Hot Cues aren’t loading automatically and you’d like them to, press and hold the MENU / UTILITY button or press the SHORTCUT button on the rotary selector. Set “HOT CUE AUTO LOAD” to “ON” or to the rekordbox setting “ON,” which automatically loads Hot Cues for all tracks when they’re loaded.

QUANTIZE

With older models of CDJs, to create a loop you’d use the LOOP IN and OUT buttons to set its length, and then use the IN ADJUST and OUT ADJUST buttons to correct any timing issues if you pressed the IN or OUT button too early or too late. Nowadays, with QUANTIZE, these corrections are essentially done for you.

If your tracks have been analysed in rekordbox, QUANTIZE will snap the loops, hot cues , and cue points you create to the grid, putting things perfectly in time. If you turn QUANTIZE off, you’ll have to manually adjust your loops and cues.

CUE/LOOP CALL, DELETE, MEMORY

CUE/LOOP CALL

These two arrows allow you to “call”—i.e. navigate to—the cue points, saved loops, and memory points you’ve made on your track, either on the player or in rekordbox, where you can add up to ten memory points per track. Press the arrows to move through these different points.

For example, if a track has a beatless intro, you could cue up your track (using the CUE button and the jog wheel) so it begins on the first drum beat. You can then save that cue point by pressing MEMORY. Having skipped the beatless intro (which may not suit a peak-time set, for example), you can press play and blend the track from your new cue point.
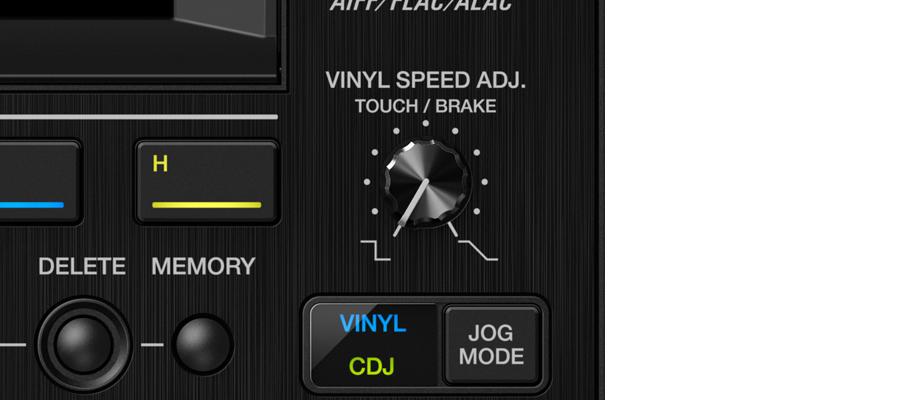
MEMORY

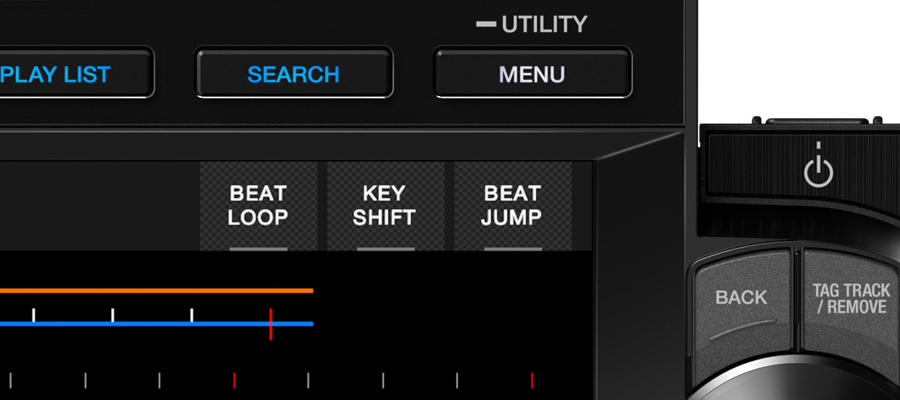
Memory points are convenient for marking specific parts of a track where something significant happens, like a vocal, a percussive element, or something unexpected. These moments aren’t always obvious in the waveform (compared to the straight lines of a kick drum), which is where MEMORY comes in. When a vocal arrives in a track, for example, you can hold down the MEMORY button and you’ll see a red triangle mark this point in your loaded track on the touch display. Now you know next time that something significant happens in that part of the track.

You can also add your own notes to memory points via rekordbox (not on the player itself), where you can write a note about exactly what happens at the point where you’ve added your memory marker, e.g. “vocal” or “Amen break” etc.

Watch Avalon Emerson below explain why she adds notes to memory points in rekordbox. In this example, the first “note” Avalon made for her first memory point in the track is ‘VOX’, meaning when the playhead hits that memory point, a vocal comes in. Once the playhead passes the memory point, her note changes to ‘C skip second chorus’. In this case, Avalon needs to press Hot Cue C at the next memory point, thus skipping a chunk of the song.

Although Avalon uses CDJ-2000NXS2s, the memory function is the same on the CDJ-3000.

DELETE

To delete memory points, simply use the CUE/LOOP CALL arrows to find and select the memory points you want to erase, then press the DELETE button so the red triangle disappears.

BEAT LOOP (1/2X), 8 BEAT LOOP (2X)

Also known as the Auto Loop functions. Here, you can loop 4 or 8 beats, and the CDJ will set the loop perfectly (like you would if you were using QUANTIZE), so there’s no need to adjust your loops manually using the IN ADJUST and OUT ADJUST functions.

What’s cool about this button is that you can also half or double the loop (hence the 1/2X and 2X underneath). For example, once you’ve pressed the 8 button to create an 8-beat loop, pressing 2X will create a 16-beat loop; if you’d pressed 1/2X you’d have a 4-beat loop, then a 2-beat loop if you press it again, and so on, all the way down to a 1/64-beat loop.

At this point, the track would stutter, which could go down well with certain crowds just before a drop. When you’ve built enough hype with the stuttering beat (be careful not to overdo it), press RELOOP / EXIT, and you’re in the drop.

BIANCO here brings the BEAT LOOP to life via Backyard Mix.

BEAT JUMP

BEAT JUMP allows you to jump forwards and backwards according to the beat loop values you set. To do this, press the SHORTCUT button (to the right of the rotary selector), which then presents you with the Beat Jump Value grid on the touch display.

Choose the beat jump value you want, meaning how many beats you want to jump (or skip) through in the track when you hit BEAT JUMP. The selectable values are ½ beat, 1, 2, 4, 8, 16, 32 and 64.

We’ll use a typical house track as an example for a BEAT JUMP scenario. Select 32 (8 bars of music) as your Beat Jump Value and press SHORTCUT again to leave the menu.

Let’s say there’s a beatless breakdown coming up in the track, and you want to jump past it because you feel the crowd would prefer the drums to keep rolling. Just as you reach the break, you’d hit the > (forwards) BEAT JUMP button, which would skip right past it. Of course, this depends on you knowing that skipping 32 beats would take you past the break. If you’re playing trance, you might be working with Beat Jump Values of 64 to achieve the same result.

This is an excellent feature if the crowd is swingin’ from the rafters and you want to keep the energy high by jumping past lower-energy sections of a track. Another way to think of BEAT JUMP is that you’re creating edits on the fly.

Here’s SPFDJ beat-jumping IRL, broken down again by Backyard Mix.

KEY SHIFT tab on the touch display

KEY SHIFT is a function on the touch display that’s useful for DJs who don’t have musical training or perhaps don’t know if they’re mixing in harmony. We won’t go into detail about key/harmonic mixing here, but as we’ve spoken about before, it’s a technique that comes down to personal preference as much as anything.

When you tap KEY SHIFT, the screen displays three buttons, indicating the semitones you can increase or decrease your track by to match it with the same key (or a harmonically related key) as the track playing on the Master deck.

Aside from harmonic mixing, you could use KEY SHIFT to change the mood of a track. Let’s say you have an extended breakdown in a trippy techno cut. You could make the break sound weirder by tapping KEY SHIFT a few times to increase or decrease the semitones. Then, just before the track drops, you could reset the key to its original state by tapping the middle button, which conveniently says RESET.

KEY SYNC

What’s the difference between KEY SHIFT and KEY SYNC? Instead of manually tapping the shift increase and decrease buttons until your track harmonically matches the one playing out on the dance floor, KEY SYNC does this work for you automatically.

David Guetta likes to use KEY SYNC. In the video below for DJ Mag’s “How I DJ” series, he explains how he uses the feature to mix two tracks, one in C and the other in E. You can hear the slight difference between the mixes when KEY SYNC is off. “It’s not horrible,” he says, “but it’s not nice.”

VINYL SPEED ADJ. TOUCH/BRAKE

This dial allows you to adjust the touch and brake speed of the jog wheel when VINYL mode is activated. If you’re scratching in VINYL mode, you’ll want to look at the VINYL SPEED ADJ. TOUCH/BRAKE dial. Its purpose is to replicate the lag of a turntable motor. Turn it clockwise, and you’ll increase the amount of lag. Turn it counterclockwise, and you’ll decrease it. This dial is good for controlling vinyl-style FX—the desirable slow-down and speed-up sound a record makes on a turntable.

In the video below, A-Trak scratches a Hot Cue set to a Missy Elliott vocal. If the vinyl speed of the brake is too fast, he won’t get the “chirp” sound he likes in the vocal. If the vinyl speed is too slow, the vocal will drag on into the next syllable, which he doesn’t want. That’s why the position of the dial is crucial here.

TAG TRACK / REMOVE

This feature has been around since 2009. Pioneer DJ / AlphaTheta developed it for the CDJ-2000, and it remains on the CDJ-3000 because it’s a helpful tool for a simple but valuable reason. If you press this button, you’re tagging the track on the player (regardless of whether it’s paused or playing; once you press TAG TRACK / REMOVE, the track is tagged), and the player then stores it in its TAG LIST.

Let’s say you play a track that throws off the dance floor—in a good way. Instead of taking a mental note of the track to later put it into a rekordbox playlist, you can tag the track by pressing and holding the TAG TRACK / REMOVE button. The CDJ will then add the track to the TAG LIST on the player.

But why is REMOVE mentioned here? You’ll see the answer in the TAG LIST description…

TAG LIST

TAG LIST is the home of your tagged tracks. Here you’ll find the tracks that you tagged for any reason during your set. You could have tracks in this list that are proven to rescue a wilting dance floor, a track with a fun vocal you’ll want to access quickly and easily, or even a few oddball tunes for specific moments.

It’s like making a playlist in rekordbox, but this time, you’re making a playlist on the unit itself. On the CDJ-3000 you can convert a TAG LIST into a playlist by tapping the MENU button and selecting CREATE PLAYLIST.

To remove a track from the TAG LIST, select the track using the rotary selector, and when the track is highlighted, press and hold the TAG TRACK/REMOVE button until it’s removed.

TRACK FILTER / EDIT

As the name suggests, this button allows you to filter tracks according to tag information from rekordbox and filter conditions, which include BPM, Key, Rating, and Color. Like QUANTIZE, however, this button only works if you’ve analysed your music in rekordbox.

TRACK FILTER / EDIT is a time-saving tool that will help you find or ‘filter’ certain tracks in specific situations. For example, if you want to promptly find a few tracks to harmonically match a track in the key of C, you would select C in the key range on the touch display. The CDJ will then offer you a playlist of tracks in the key range of C.

The same goes for BPM. If you’re playing a 145 BPM track on the Master player and need to swiftly find tracks in a similar BPM range, you could use the TRACK FILTER / EDIT feature and choose the percentage range of the BPM you’re looking for. So, you could enter 145 into the BPM box (via the touch display) and select a 6% BPM range.

After filtering your track according to your desired “condition,” press MY TAG on the touch display, and you’ll see four categories (sourced from rekordbox): Genre, Components, Situation, and Maintenance. Select the labels or ‘tags’ underneath these categories, e.g. Techno, Cowbell, Peak Time, and Hot Cues. When you’re done, press the TRACK FILTER / EDIT button to exit, and a filter will be applied to the tracks you want in that particular key and BPM range. You’ll know they’re a match because the tracks will be highlighted in green and they’ll have a small filter symbol.

If this sounds overwhelming, the video below should help.

SHORTCUT

With this button, you can take a shortcut to the BROWSE mode and MY SETTINGS on the player’s touch display. On the touch display, you can change the waveform phase meter; auto load your Hot Cues or turn them off; adjust the brightness of the screen and jog wheel; choose the values for quantizing your beats; set your beat jump values; and change both the colour and position of your waveform.

There’s more on this here:

Summing up

While tight beat-matching, EQing, and strong track selection are the fundamentals of DJing (in my opinion), knowing how to use the deeper features on the CDJ-3000 is a big bonus. This knowledge will help you develop, advance, and define your style as a DJ. These features can add twists and turns to your sets, no matter the genre. At times, it can even start to feel like you’re making a new track or remixing on the spot. Besides, pushing buttons is simply good fun.